配置教程
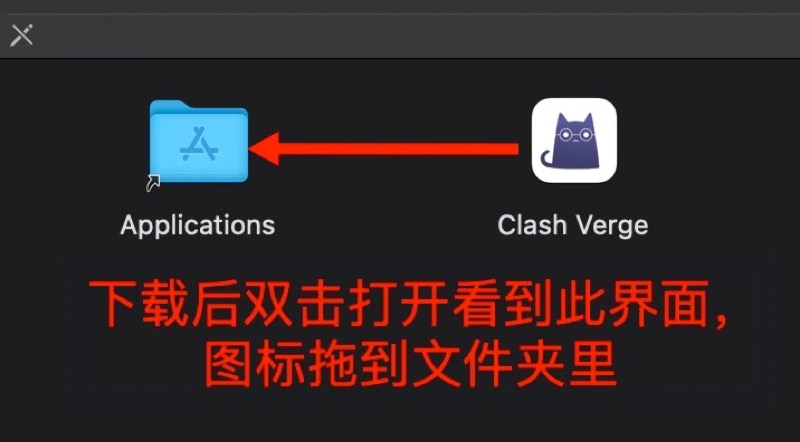
📥 一、下载安装
选择你的芯片版本下载:
历史版本:GitHub Releases
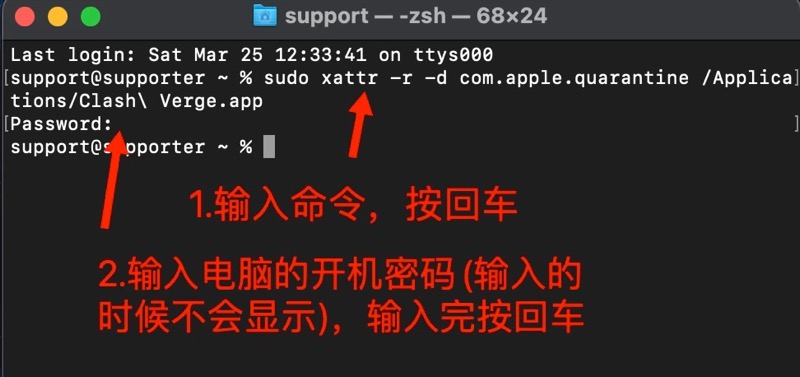
提示:macOS 提示「文件已损坏」
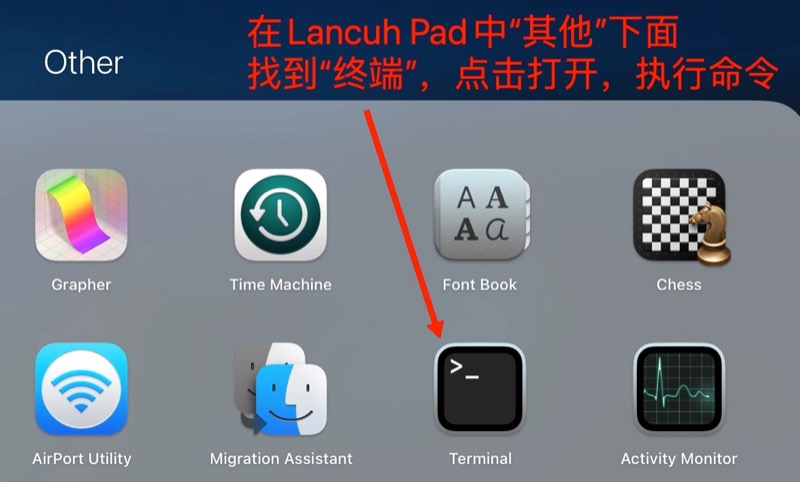
这是因为开发者未签名导致的,打开「终端」输入以下命令:
sudo xattr -r -d com.apple.quarantine /Applications/Clash\ Verge.app
按回车 → 输入电脑密码(不会显示)→ 再按回车。然后在启动台打开 Clash Verge
📄 二、导入配置
- 打开 Clash Verge
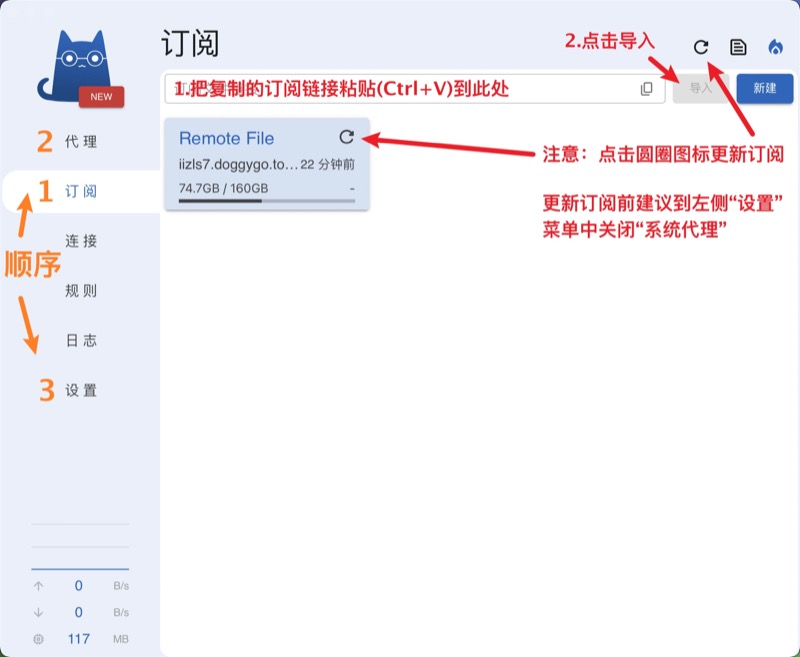
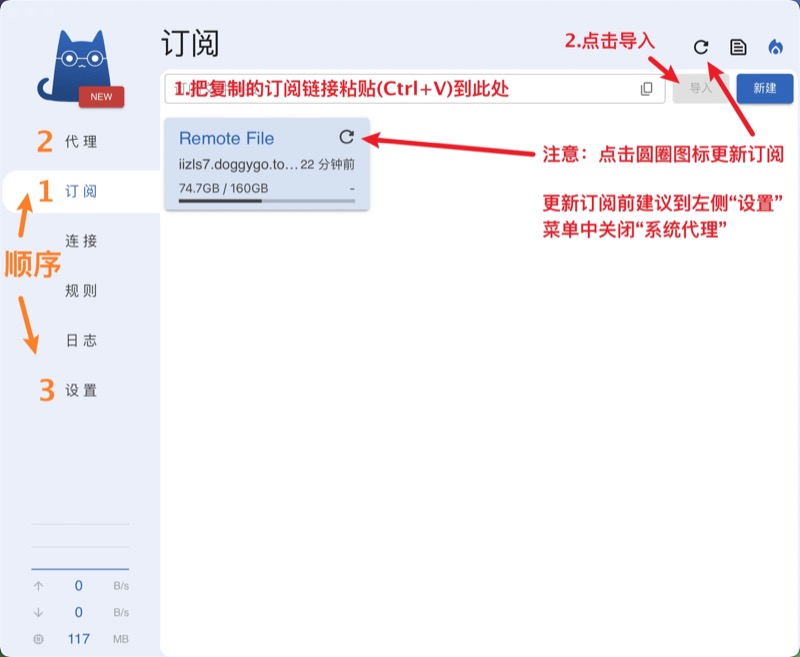
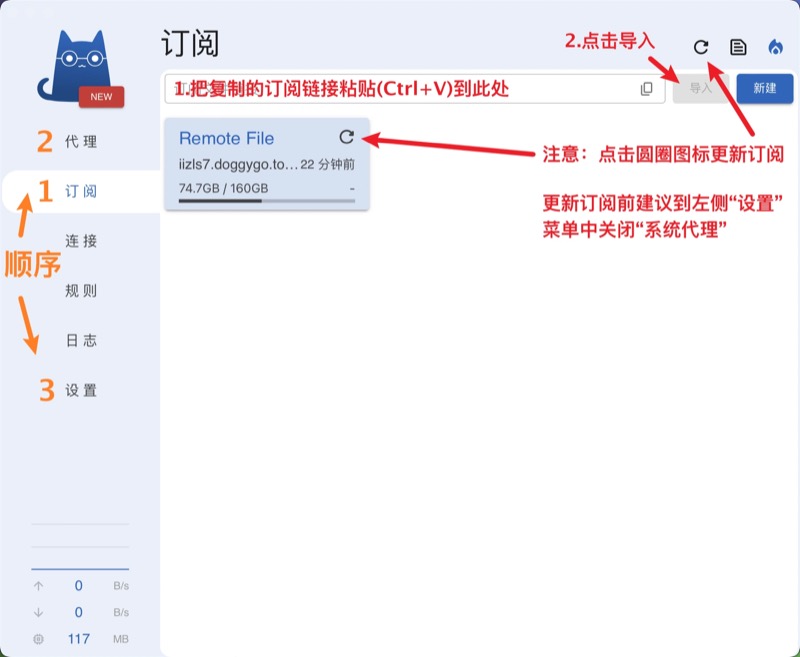
- 复制科学上网「我的Key」的URL,打开 Clash Verge → 点击「配置」→ 粘贴到文本框 → 点击「导入」
🌐 三、选择线路并启用
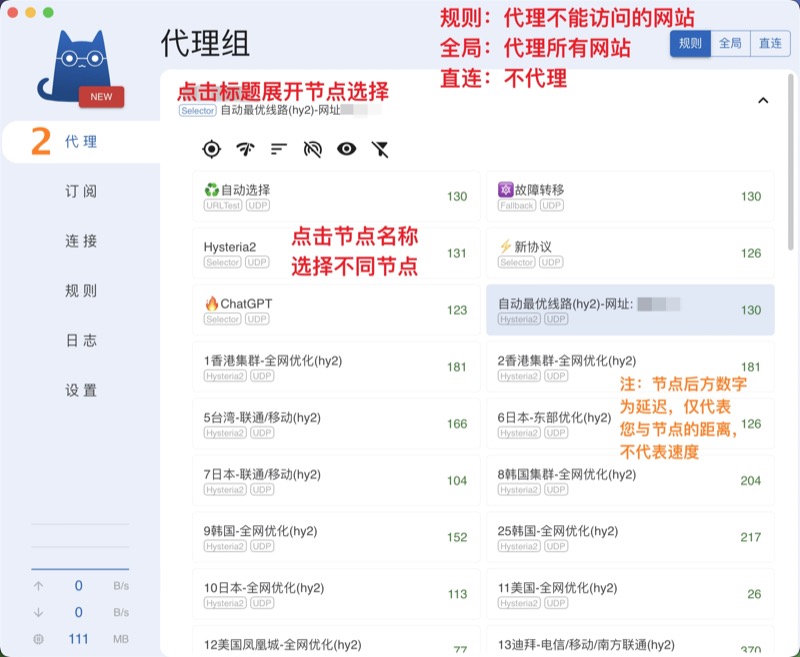
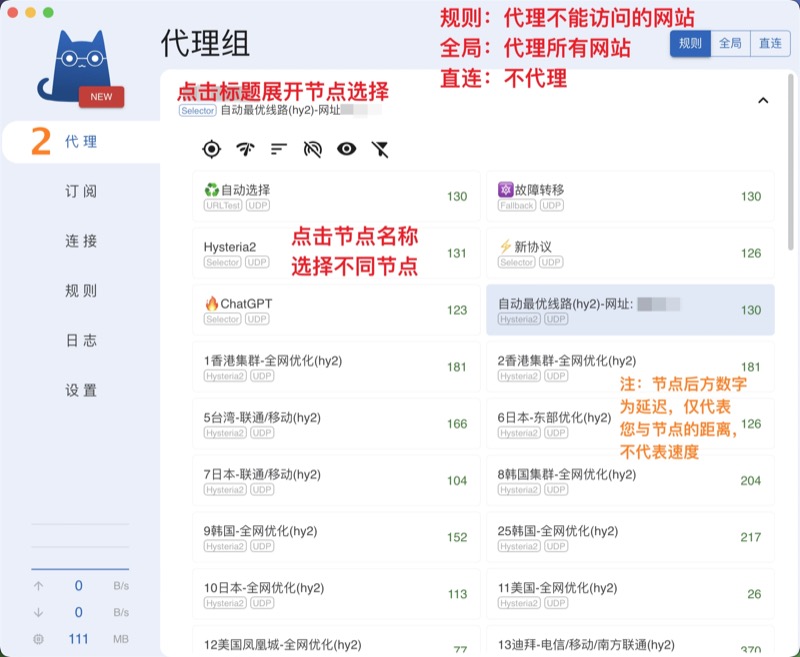
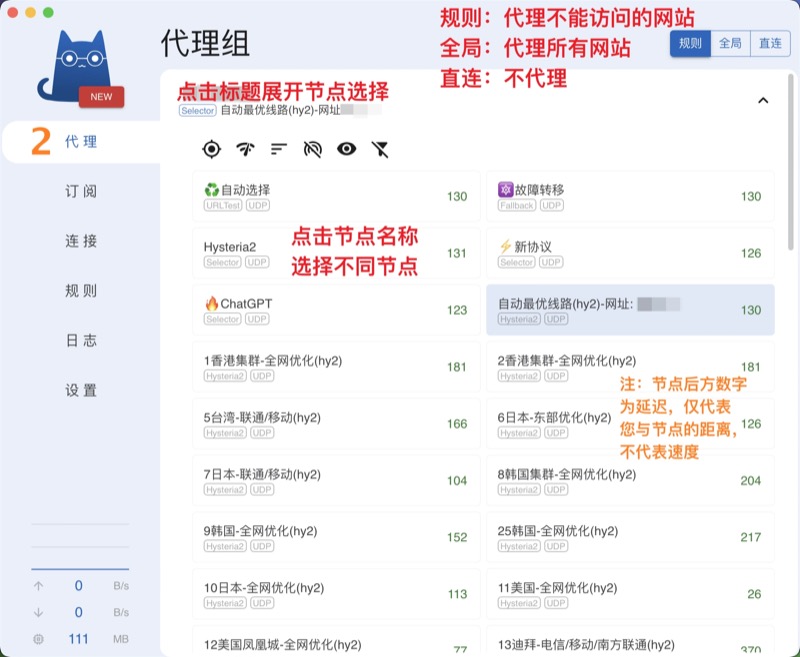
- 点击「代理」,选择线路,务必选择「新加坡」或「日本」
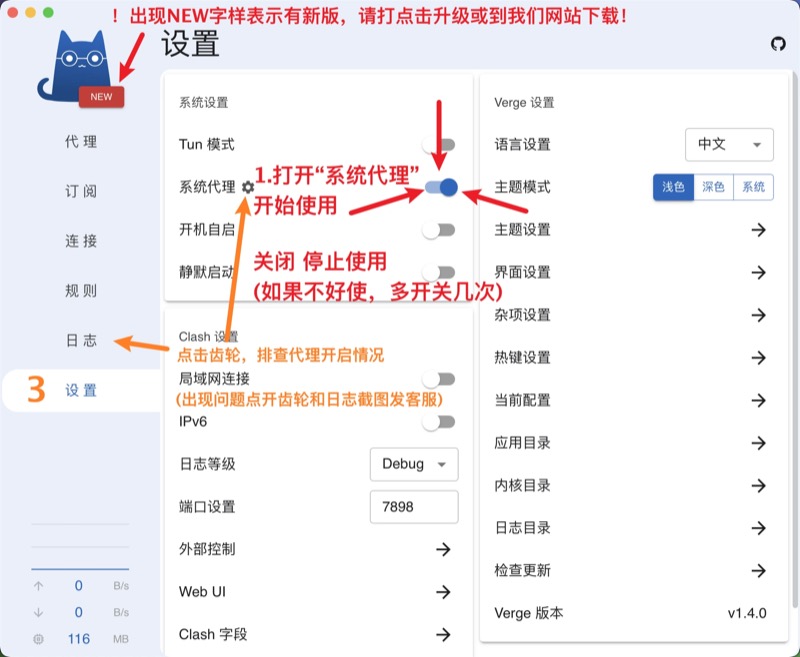
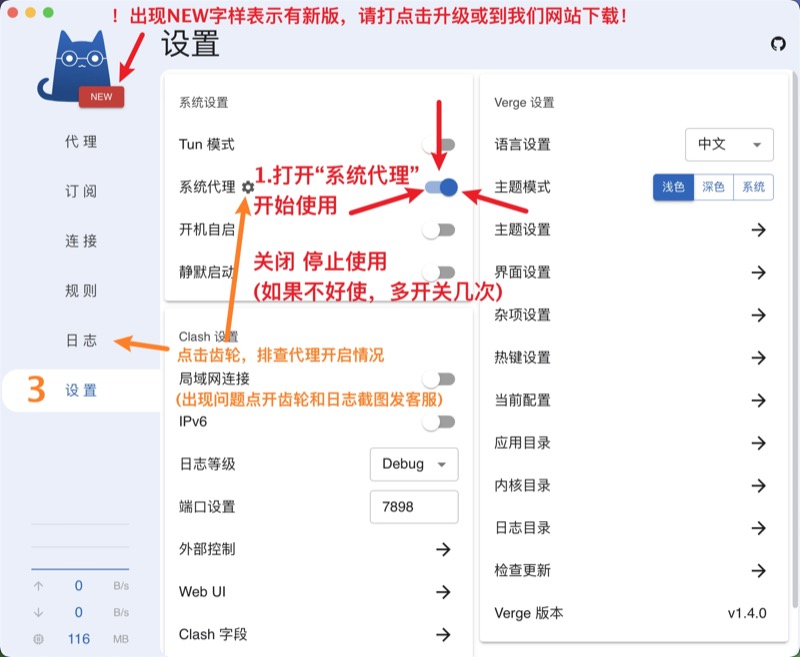
- 点击「设置」→ 启用系统代理,开始使用
📥 一、下载安装
点击下载 Clash Verge(Windows 64 位):
历史版本:GitHub Releases
📄 二、导入配置
- 在桌面或开始菜单找到 Clash Verge,双击运行
- 复制科学上网「我的Key」的URL,打开 Clash Verge → 点击「配置」→ 粘贴到文本框 → 点击「导入」
🌐 三、选择线路并启用
- 点击「代理」,选择线路,务必选择「新加坡」或「日本」
- 点击「设置」→ 启用系统代理,开始使用
📥 一、下载安装
Debian / Ubuntu(.deb):
历史版本:GitHub Releases
安装命令:
sudo dpkg -i clash-verge-latest-amd64.deb
sudo rpm -i clash-verge-latest-amd64.rpm
📄 二、导入配置
- 运行 Clash Verge
- 复制科学上网「我的Key」的URL,打开 Clash Verge → 点击「配置」→ 粘贴到文本框 → 点击「导入」
🌐 三、选择线路并启用
- 点击「代理」,务必选择「新加坡」或「日本」
- 点击「设置」→ 启用系统代理
📥 一、安装
通过 npm 全局安装:
npm install -g @anthropic-ai/claude-code
claude -v
⚙️ 二、配置中转
自动方式(推荐):
curl -fsSL {{ scriptBaseUrl }}/claude.sh | bash -s -- {{ (getUserApiKey(acc) || '').split(':').slice(1).join(':') || getUserApiKey(acc) }}
curl -fsSL {{ scriptBaseUrl }}/claude.sh | bash -s -- 替换为您的API Key
手动方式:
编辑 ~/.claude/settings.json,写入以下内容:
{
  "env": {
    "ANTHROPIC_AUTH_TOKEN": "{{ (getUserApiKey(acc) || '').split(':').slice(1).join(':') || getUserApiKey(acc) }}",
    "ANTHROPIC_BASE_URL": "https://api.cannbot.com"
  },
  "permissions": {
    "defaultMode": "bypassPermissions"
  },
  "disableLoginPrompt": true,
  "skipAutoPermissionPrompt": true
}
{
  "env": {
    "ANTHROPIC_AUTH_TOKEN": "替换为您的API Key",
    "ANTHROPIC_BASE_URL": "https://api.cannbot.com"
  },
  "permissions": {
    "defaultMode": "bypassPermissions"
  },
  "disableLoginPrompt": true,
  "skipAutoPermissionPrompt": true
}
🚀 三、使用
一般情况,在终端中运行:
cannbot 提供每日额度为 1 亿 tokens 的国产模型,推荐使用官方 cannbot agent。如果对其他 Agent 有诉求,可以按照以下配置实现中转。
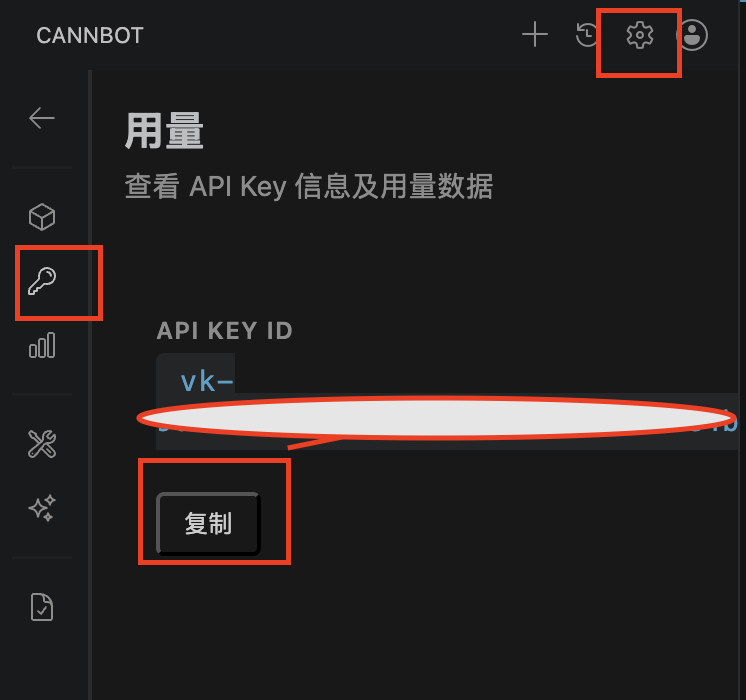
🔑 一、如何获取 vkey
- 在 VSCode 中安装插件 cannbot
- 登录 gitcode 账号
- 点击 cannbot 的设置按钮 → 用量
🚀 二、配置vkey中转
备注:所有的命令都在命令行中执行
将以下命令中的 替换你的vkey 替换为你获取到的 vkey 后执行。
Claude 使用 vkey:
npm install -g @anthropic-ai/claude-code
claude -v
curl -fsSL {{ scriptBaseUrl }}/cannbot2claude.sh | bash -s -- 替换你的vkey
claude
Codex 使用 vkey:
npm install -g @openai/codex@latest
codex --version
curl -fsSL {{ scriptBaseUrl }}/cannbot2codex.sh | bash -s -- 替换你的vkey
codex
opencode 使用 vkey:
npm i -g opencode-ai
opencode --version
curl -fsSL {{ scriptBaseUrl }}/cannbot2opencode.sh | bash -s -- 替换你的vkey
opencode
DeepSeek Harness 使用 vkey:
npm install -g @deepseek-ai/dsh
dsh --version
curl -fsSL {{ scriptBaseUrl }}/cannbot2dsh.sh | bash -s -- 替换你的vkey
dsh web
🔙 三、恢复配置
curl -fsSL {{ scriptBaseUrl }}/reset.sh | bash
📥 一、安装
通过 npm 全局安装:
或访问官网查看安装指南:https://opencode.ai/
⚙️ 二、配置中转
自动方式(推荐):
curl -fsSL {{ scriptBaseUrl }}/opencode.sh | bash -s -- {{ (getUserApiKey(acc) || '').split(':').slice(1).join(':') || getUserApiKey(acc) }}
curl -fsSL {{ scriptBaseUrl }}/opencode.sh | bash -s -- 替换为您的API Key
手动方式:
编辑 ~/.config/opencode/opencode.jsonc,写入以下内容:
🚀 三、使用
一般情况下,在终端中运行:
📥 一、安装
通过 npm 全局安装:
npm install -g @openai/codex@latest
codex --version
⚙️ 二、配置中转
自动方式(推荐):
curl -fsSL {{ scriptBaseUrl }}/codex.sh | bash -s -- {{ (getUserApiKey(acc) || '').split(':').slice(1).join(':') || getUserApiKey(acc) }}
curl -fsSL {{ scriptBaseUrl }}/codex.sh | bash -s -- 替换为您的API Key
手动方式:
编辑 ~/.codex/config.toml,写入以下内容:
model_provider = "mycodex"
model = "gpt-5.6-sol"
model_reasoning_effort = "high"
disable_response_storage = true
approval_policy = "on-request"
sandbox_mode = "danger-full-access"
model_supports_reasoning_summaries = true

[model_providers.mycodex]
name = "mycodex"
base_url = "https://api.cannbot.com"
wire_api = "responses"
requires_openai_auth = true
编辑 ~/.codex/auth.json,写入以下内容:
{
  "OPENAI_API_KEY": "{{ (getUserApiKey(acc) || '').split(':').slice(1).join(':') || getUserApiKey(acc) }}"
}
{
  "OPENAI_API_KEY": "替换为您的API Key"
}
🚀 三、使用
在终端中运行以下命令启动 Codex:
📥 一、安装
通过 npm 全局安装:
npm install -g @deepseek-ai/dsh
dsh --version
⚙️ 二、配置中转
自动方式(推荐):
curl -fsSL {{ scriptBaseUrl }}/dsh.sh | bash -s -- {{ (getUserApiKey(acc) || '').split(':').slice(1).join(':') || getUserApiKey(acc) }}
curl -fsSL {{ scriptBaseUrl }}/dsh.sh | bash -s -- 替换为您的API Key
手动方式:
编辑 ~/.dsh/settings.yaml,写入以下内容:
llm-pi-ai:
  providers:
    cannbot:
      displayName: CANNBot
      apiKeyEnv: CANNBOT_DSH_LOCAL_KEY
      api: openai-completions
      baseURL: "https://api.cannbot.com/v1"
      compat:
        supportsDeveloperRole: false
        maxTokensField: max_tokens
      models:
        - id: deepseek-v4-pro
          name: DeepSeek V4 Pro
          contextWindow: 1048576
          maxTokens: 8192
        - id: deepseek-v4-flash
          name: DeepSeek V4 Flash
          contextWindow: 1048576
          maxTokens: 8192
        - id: glm-5.2
          name: GLM-5.2
          contextWindow: 1048576
          maxTokens: 8192
        - id: glm-5.3
          name: GLM-5.3
          contextWindow: 1048576
          maxTokens: 8192
        - id: glm-5.3-flash
          name: GLM-5.3 Flash
          contextWindow: 1048576
          maxTokens: 8192
agent-default-model:
  provider: cannbot
  model: deepseek-v4-pro
编辑 ~/.dsh/.env,写入以下内容:
CANNBOT_DSH_LOCAL_KEY={{ (getUserApiKey(acc) || '').split(':').slice(1).join(':') || getUserApiKey(acc) }}
CANNBOT_DSH_LOCAL_KEY=替换为您的API Key
🚀 三、使用
在终端中运行以下命令启动 DSH:
| 账号名称 {{ sortOrder === 'asc' ? '↑' : '↓' }} |
AI模型 {{ sortOrder === 'asc' ? '↑' : '↓' }} |
使用人 {{ sortOrder === 'asc' ? '↑' : '↓' }} |
使用目的 |
使用时间 {{ sortOrder === 'asc' ? '↑' : '↓' }} |
归还时间 {{ sortOrder === 'asc' ? '↑' : '↓' }} |
时长 {{ sortOrder === 'asc' ? '↑' : '↓' }} |
| {{ r.account_name }} |
{{ model }}
|
{{ r.user_name }}({{ r.user_account }}) |
{{ r.purpose || '-' }} |
{{ r.start_time }} |
{{ r.end_time || '使用中' }} |
{{ r.duration }} |
👥
还没有授权用户
添加后,只有列表中的用户才能使用账号
{{ usageScopeLabel }}消耗额度
{{ formatTokenCount(currentUsage.total_tokens) }}
最近快照:{{ currentUsage.synced_at }}
暂无快照数据
・{{ usageScheduleHint }}
| 排名 |
用户 |
账号 |
消耗额度 |
| {{ index + 1 }} |
{{ item.user_name }} |
{{ item.user_account || '-' }} |
{{ formatTokenCount(item.consumed_tokens) }}
|